![]() Entering component data
Entering component data
![]() Entering component data
Entering component data
|
<< Click to Display Table of Contents >>
|
  
|
To enter component data, select the desired component icon and double-click it, or right-click and select Edit to open the component data window. This data window consists of a header containing some information of the simulation block and a structured collection of tab sheets containing input fields or grids to modify the model properties. The data management functionality decides which input fields or grids are available for editing. Non-editable input fields will be disabled.
The input depends on the type of simulation, model property, configuration, etc. Common input specifiers are e.g. numerical input boxes, text input boxes, radio buttons, check marks, numerical input grids. Numerical input grids are usually controlled by the accompanying grid navigator:
![]()
This navigator interface element contains buttons to step through the grid or add and remove rows from the grid. In case such a navigator is not supplied, the 'arrow down' button can be used to add a row to the bottom of the grid, the 'Insert' button can be used to add a row before the current selected row, and the 'Delete' button can be used to delete a row from the grid. Note that a right-click on most grids results in a pop-up menu with some additional options.
Next to ID string input field is the color picker for the data output table. The selected color will be the background of the output parameter grid for the output of this component. A color picker is available where custom colors (preferably light colors) can be selected. Right click for a menu option to revert the color to default/design.
The Units drop down box can be used to select the unit system for the component. Default the units are "As Model" which can be set in Output|General|Units for the complete model. Change the value to "SI" or "Imperial" to change the unit system from the default for this component only.
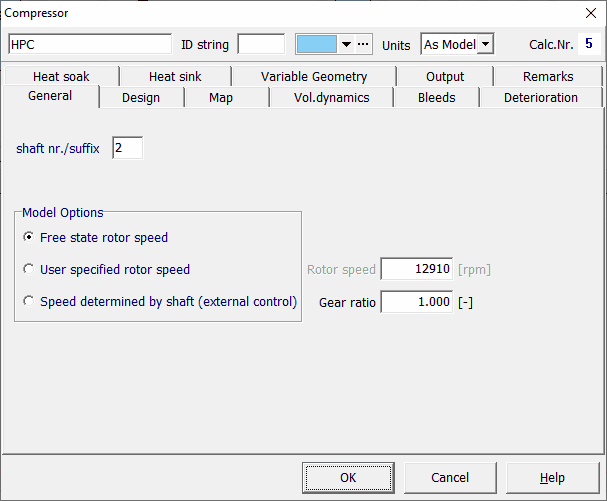
•General
The General tab sheet is used to set general component properties, model options, off-design input parameters, component specific data and component options. After a design point has been calculated, the General tab sheet will usually be used to change general component properties for analysis of off-design behavior (constant in time).
•Design
Design values, colored navy blue when using standard Windows colors, are used for specification of the component's design point performance parameters. Use this tab sheet only prior to a new design point calculation. Design values are not used during off-design simulation if corresponding variables are specified in other tab sheets. Note that the design calculation resets off-design variables to their design variables, if Auto Reset Input to Design is checked in Options|General.
•Map
Many component types have their off-design performance described in maps. GSP maps represent non-linear characteristics between 2 to 5 parameters for components such as the fan, and are stored in tabular format in separate ASCII files (or embedded in XML format). The Map tab sheet contains controls to select map files, specify map design values and show graphical representations of the map, as displayed in the following figure.
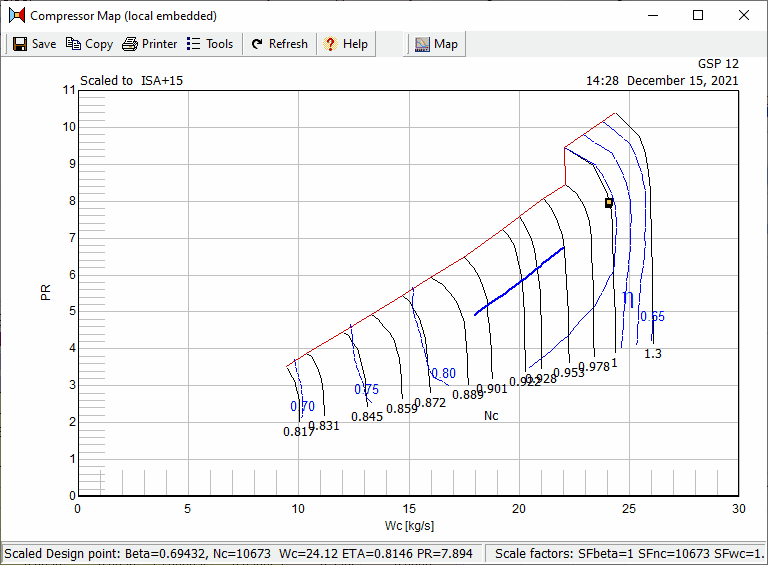
For most maps, parameters corrected for component entry conditions are used. With the map design values, the map can automatically be scaled to the design parameters of the model, e.g. scale a compressor map to a larger compressor (i.e. larger flow rate), a different rotor speed, higher efficiency or different pressure ratio (see section). This allows the use of maps from other gas turbine models with similar components (e.g. a similar axial compressor with about the same number of stages but a lower air flow rate).
Use the Show Graph button to show a graphical representation of the map. In section Graphical output it is described how to obtain simulation result operating curves in maps. After design point calculation, the map can be shown with parameters scaled to the design point. Depending on the type of component, several ways of displaying the relations among the parameters are possible (different parameters at X and Y axes).
•St. St. Series / Transient
In the Transient tab sheet input parameters can be specified as a function of time in tabular format as displayed. With the Transient input activated checkbox the time function can be enabled or disabled during transient or steady state series calculations.
When disabled or when only one row is present, the single off-design conditions specified in the General or other tab sheets are used instead (and input is constant in time). The navigator buttons are used to add, insert and delete rows, while right-clicking on a value in a table and selecting Edit, or double-clicking the value allows you to edit the value.

Use the Graph button for a graphical representation of the transient input time functions.
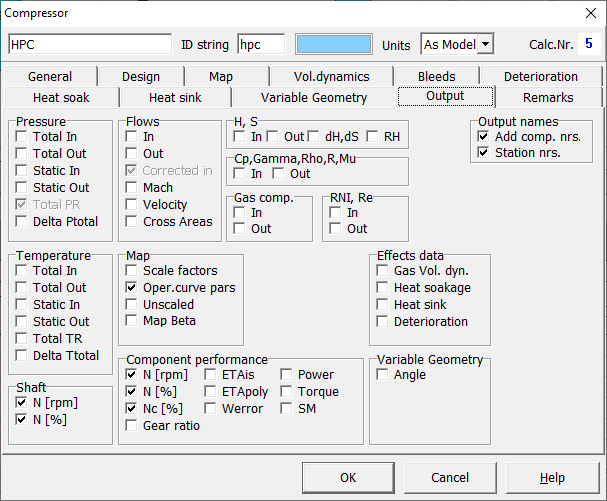
•Output
In the Output tab sheet parameters which will be included in the results tables can be specified using check boxes as displayed. You are advised to limit the number of output parameters in order to avoid very wide output tables and large amounts of output data that hinder finding the data of interest.
In the various output tables and graphs, component numbers and/or station numbers are added to output parameter identifiers for identification where applicable. For example, pressures and temperatures typically apply to engine stations resulting in Pt2 as the total pressure at station 2. Parameters applying to the component are identified with component numbers preceded by the '_' character. The '_' is for distinguishing component from station numbers, for example resulting in PR_2 for the pressure ratio for component number 2. If the ID string field at the top of the component data form is filled, this string is used instead to identify the component, for example resulting in PR_compr when compr is entered in the field.
•Deterioration
With the Deterioration tab sheet you can implement deterioration effects for several components. These deterioration effects apply to mass flow, pressure and efficiency.
•Remarks
The Remarks tab sheet can be used to record additional descriptions or remarks.